Click here to go to the Tersus web site
GETTING STARTED IN 30 SECONDS
1) Create Your New Project
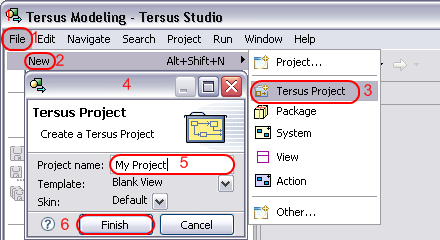
  • Select File (1)->New (2)->Tersus Project (3) to open the New Tersus Project (4) wizard.
  • Enter a name of your choice (e.g. My Project) (5) for your new project and click Finish (6).
Once you click Finish, you should move this document to the bottom part of the studio's window, which will reveal the studio itself, but still allow you to follow the instructions given here.
To do so, double-click the  tab, or click the (Restore) button found along the top of the Welcome window.

The studio opens the new project's model for editing in the Model Editor (on the right), while a list of projects, which includes pre-installed sample projects, is displayed in the Repository Explorer (on the left of the screen).

2) Use Your New Application
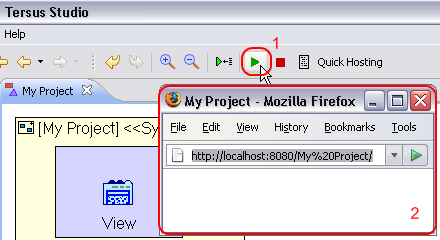
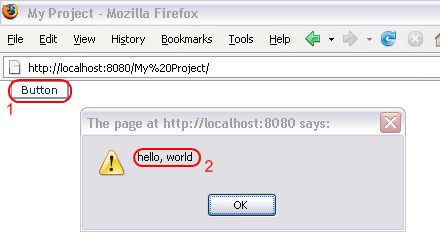
Click on the Launch the application (1) button in the studio's main toolbar to load your application in the embedded Tersus Server and open it in a web-browser (2).

The application displays nothing yet, so let's model something to display.

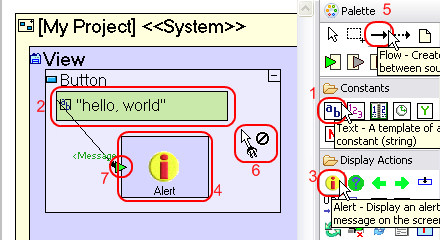
3) Add your own modeling - With Instant Results
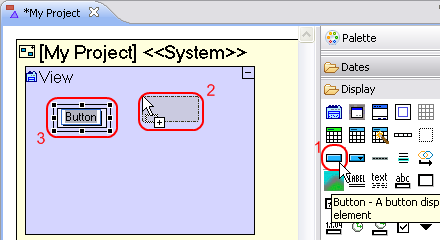
We shall now add our own modeling to the application, displaying the message hello, world when a button is clicked.
  • Switch back to the Tersus Studio.
  • In the Model Editor (the drawing on the screen), double-click the View model (the big blue rectangle) to zoom into (and expand) it.
  • Click the Button (1) template in the Display category of the Palette, to select it. Note the change in the mouse pointer (2).
  • Click inside the View model in the editor, to position the Button element in the view (3). You will be prompted to provide a name for the button. Leave it with the default Button.
  • Double-click the Button model, to zoom into it
  • Click the Text (1) template in the Constants category of the Palette, to select it.
  • Click inside the Button model in the editor, to position the Text element in the button (2). You will be prompted to provide the value of the constant (with the default being Text). Enter hello,world.
  • Click the Alert (3) template in the Display Actions category of the Palette, to select it.
  • Click inside the Button model in the editor, to position the Alert model in the button (4).
  • Click the Flow (5) tool in the toolbox at the top of the Palette to select it. Note the change in the mouse pointer (6).
  • Click the hello, world (2) constant, to specify the source of the flow.
  • Click the <Message> trigger (7) of the Alert model, to specify the target of the flow.
  • Save your changes (through File->Save menu option, CTRL+S shortcut or the Save toolbar button).
  • Switch back to your web-browser window, which should refresh automatically.
  • Press the Button (1) to see the message hello, world (2).

4) What next?
We recommend that you continue to the second part of this document, in which you Start your second application in 2 minutes, the resulting application should be similar to the application created in Stage 2 of the Tersus Tutorial.
Details on the tutorial, are available here.